Azure Integration Guide
Vega requires access to your Azure subscriptions to query the Cost and Usage Metric APIs. When you use a 3rd-party software application with your Azure Subscription, you need to create an application registration. This registration is the first step of the process in allowing an Azure Subscription to be imported into the Vega Platform.
The following can be applied at Management Group levels to simplify deployment across large numbers of subscriptions.
Azure Integration Resources
The latest integration templates referenced in this guide can be found in the Integration Templates section or on the Vega GitHub repository: https://github.com/vegacloud/customer-samples
New App Registration: Vega Azure App
- Log into your Azure Portal (https://portal.azure.com/).
- Select "Azure Entra ID".
- Once you're on the Entra ID Screen, select “App Registrations” from the left navigation menu.
- On the App Registration Screen, click the “+ New registration” on the far left of the top navigation bar. You will have to enter a Name, we suggest “VegaAzureApp”.
- Select the supported account type of “Accounts in the organizational directory only” – single tenant.
- Next, select your Redirect URI. This should be “Single-page application (SPA)” with a URL = "https://portal.vegacloud.io/azureauth".
- Once all these values are provided, select “Register” and you've finished creating the Vega Azure App.
- Navigate to the "Certificates and secrets" section of the new app registration. Under "Client secrets" click "+ New client secret".
- Create a secret with an expiry you are comfortable with, then note the secret VALUE (Not the ID) for later steps.
You will need to use the tools available to your organization to track the expiry of your keys. You are responsible to track key lifecycles and update your provider accounts with expiring secrets. Failure to do so will cause Vega to lose access to your subscription(s) associated with the expired secret.
Assign Read Only Roles
It is recommended that you use Management Groups to avoid creating Vega resources for each subscription. Perform the steps below within your Azure Management Group(s), or repeat for each subscription if Management Groups are not available.
Now that we have an application registration, we need to control the amount of access we grant to the application. We will apply the built-in Monitoring Reader role to the Management Group, or per subscription if required. We will also need to apply the built-in Billing Reader role at the Billing Scope.
Monitoring Reader Role
- Search "Management groups" and find your group, otherwise select “Subscriptions”, then select the specific subscription being imported. Select “Access control (IAM)" from the left side navigation menu.
- Within the Management Group or Subscription, Select “Access control (IAM)" from the left side navigation menu.
- Select “+ Add” from the top navigation menu and select “Add Role Assignment”.
- Once the modal opens, search for “Monitoring Reader” and select “Next”.
- Add a Description that will help identify what the role is used for, “Vega Platform Access Role”.
- In the Members section, click "+ Select members" and search "Vega" or the name you used. Click the name of the App you created in step 1 and click "Select".
- Click "Review + assign" to complete the role assignment step.
Billing Reader Role
- Search "Cost Management + Billing" and then select "Billing Scopes" from the left side navigation menu.
- Select the "Billing Scope" you wish to apply the role to by clicking on the linked text.
- Select “Access control (IAM)" from the left side navigation menu.
- Select “+ Add” from the top navigation menu.
- Once the modal opens, click the carrot on the "Role" drop-down menu, search for "Billing Account Reader" and then select it.
- Click in the "Select" input box and search for "Vega" or the name you used for your App Registration. Select the App and then click "Save" at the bottom of the modal.
Assign Operate Role (for Operate SKU customers)
This step is only required for customers with the Operate SKU.
- Follow the steps above to create an app registration and assign the same roles as above.
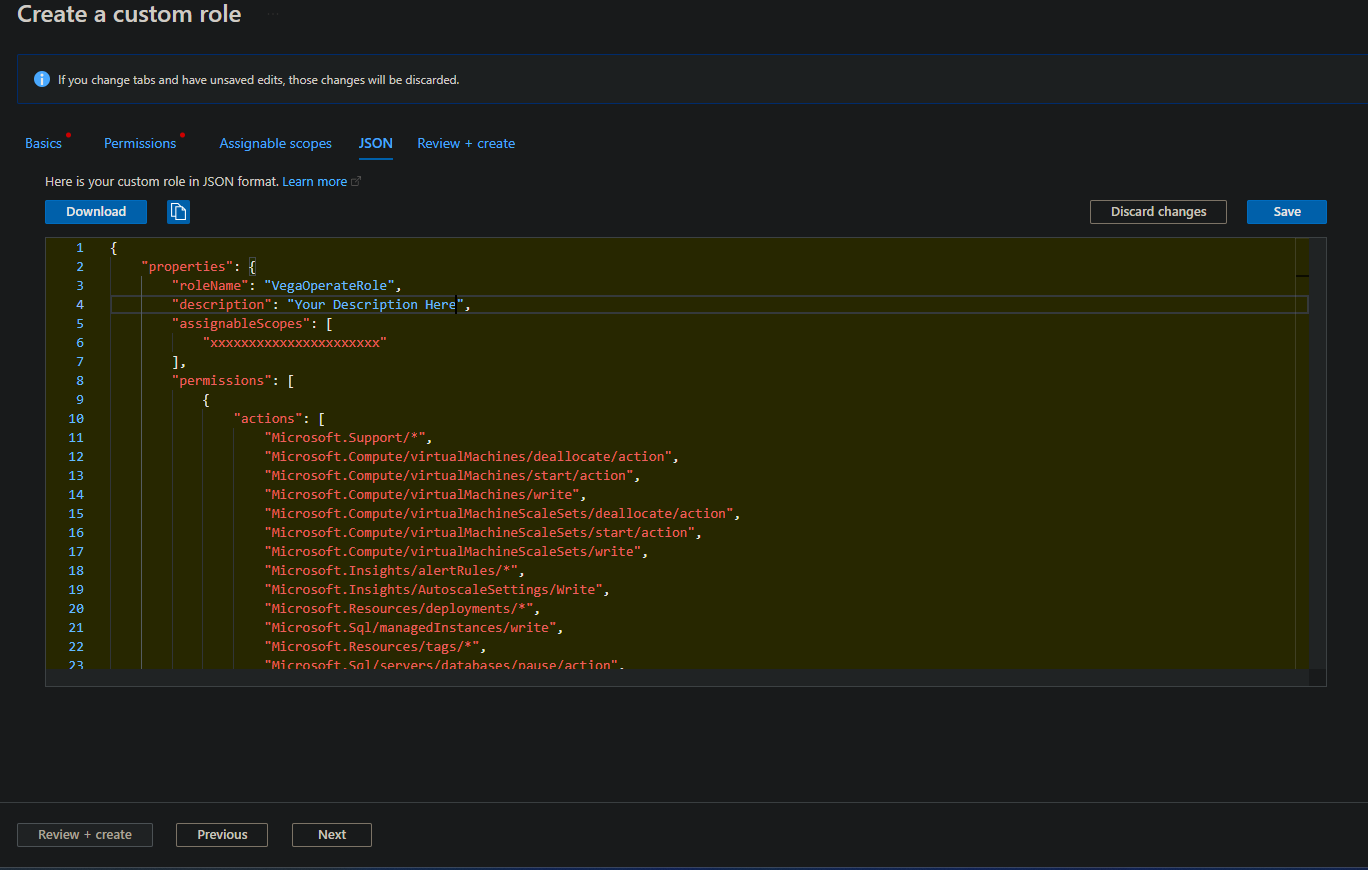
- In addition to the above roles you will need to create a custom role for the Operate SKU. This role will need to be created at either the management group level or subscription level based on your use case.
- To create a custom role, navigate to the “Access control (IAM)” section of the management group or subscription.
- Select “+ Add” from the top navigation menu and select “Add Custom Role”
- Once the modal opens, provide a name for the role, “VegaOperateRole”.
- In the "JSON" section, add the permissions under 'actions' section:

[
    "Microsoft.Support/*",
    "Microsoft.Compute/virtualMachines/deallocate/action",
    "Microsoft.Compute/virtualMachines/start/action",
    "Microsoft.Compute/virtualMachines/write",
    "Microsoft.Compute/virtualMachineScaleSets/deallocate/action",
    "Microsoft.Compute/virtualMachineScaleSets/start/action",
    "Microsoft.Compute/virtualMachineScaleSets/write",
    "Microsoft.Insights/alertRules/*",
    "Microsoft.Insights/AutoscaleSettings/Write",
    "Microsoft.Resources/deployments/*",
    "Microsoft.Sql/managedInstances/write",
    "Microsoft.Resources/tags/*",
    "Microsoft.Sql/servers/databases/pause/action",
    "Microsoft.Sql/servers/databases/resume/action",
    "Microsoft.Sql/servers/databases/write",
    "Microsoft.Sql/servers/elasticPools/write"
]
A helpful hotkey to format the JSON is ctrl+k+f (format) after doing ctrl+a (select all text) to format.
- Click "Save" to save your changes.
- Click "Review + Create" to complete the role creation step.
- Now that the Role is created, you can assign it to the Vega App Registration
- Back in "IAM", click "+ Add" and select "Add Role Assignment"
- Search for the custom role you created, “VegaOperateRole” and select “Next”
- In the Members section, click "+ Select members" and search "Vega" or the name you used. Click the name of the App you created in step 1 and click "Select".
- Click "Review + assign" to complete the role assignment step.
We will start ingesting your Azure data once you provide Vega the following information:
- App Registration Name
- Tenant ID
- App/Client ID
- Subscription associated with App Registration
- Secret Value associated with App Registration
- List of Azure subscription Names and ID's for all subscriptions
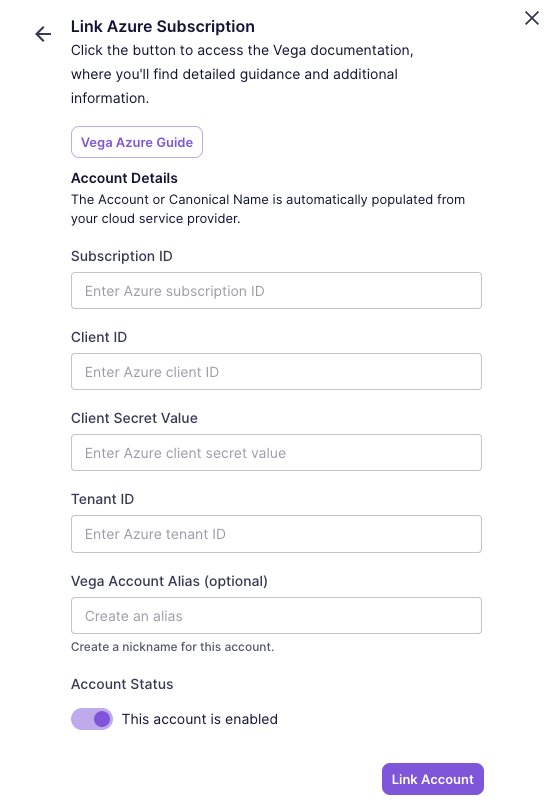
Alternatively, you can use the Vega Platform to add your Azure subscriptions yourself by following the steps below.
Adding Azure Subscriptions to the Vega Platform
- Go to Settings and Add a Provider Account.
- Enter your Azure Account information in the dialog:
 tip
tipIf you aren't ready for your accounts to be ingested by Vega yet, you can toggle the 'Enabled' switch to 'Disabled' to prevent data ingestion.
- Click
Link Accountto link the account and start the discovery process.
If you have multiple subscriptions, repeat the above steps for each subscription or alternatively use the Bulk Upload feature to add multiple subscriptions at once.