AWS Integration Guide
About the AWS Integration
Linking AWS Accounts within the Vega Platform consists of a few steps, but the Vega team is here to help you get up and running as quickly and painlessly as possible. For an interactive setup process, please contact us at support@vegacloud.io or reach out to your Customer Success Manager to schedule a data integration session.
How it Works
The Vega Platform will automatically discover all AWS resources within the linked AWS account.
There are two types of accounts that need to be onboarded to the Vega Platform
- Master Payer Account (MPA) the AWS account that owns the billing relationship with AWS.
- Linked Accounts the AWS accounts that are linked to the Master Payer Account.
AWS Integration Resources
The latest integration templates referenced in this guide can be found in the Integration Templates section
Or on the Vega GitHub repository: https://github.com/vegacloud/customer-samples
Step 1: Configure your Master AWS Payer Account Permissions
Vega uses AWS billing exports to provide detailed analysis and insight into your cloud environment. This analysis includes trending spend analytics, forecasting, optimization recommendations and more.
Please ensure your billing exports have been set up before deploying the Vega AWS MPA CFT. If you need assistance setting up AWS Billing Exports, please contact your Vega Client Success Team.
Understanding the CFT
The Vega AWS MPA CFT is intended to give the Vega team limited access into your AWS Master Payer Account environment. The specific access requested in this CFT can be modified to meet each team's level of risk aversion, but out of the box does the following:
-
Creates the VegaAdmin role which will grant the Vega team access to the account and sync data into the Vega ecosystem.
-
Allows read access to:
- Savings Plans
- Organizations
- Pricing Information
- Cost & Usage Reports (CURs) Definitions
- Cost Explorer API
- Billing Conductor
-
S3 access to specified billing buckets:
- Listing Objects
- Getting Objects
-
(Optionally) enable FinOps actions to be taken on your behalf through the Vega Platform:
- Purchase and/or modify reservations
- Configure a Savings Plan
The Vega AWS MPA CFT includes several parameters that will need to be defined during deployment:
- CurBucketsParameter: A comma-separated list of S3 bucket ARNs & objects Vega Cloud can use to build your dashboards and reports.
- ExternalId: Vega Cloud's ExternalId for your environments (helps to authenticate role assumption). This will be provided by your Vega Team.
- AttachFinOpsPolicy: True or False with a Default of False. Attach the Vega FinOps policy to the Vega Cloud Admin Role? This will provide Vega with the ability to adjust RIs, savings plans, etc. on your behalf.
Prerequisites for Deployment
Before deploying the Vega AWS MPA CFT, it is important to ensure the following:
1. AWS Hourly Cost & Usage Report (CUR) has been enabled with the following configurations:
- Legacy CUR export
- Pro forma CUR <leave toggled off>
- Enable the following:
- Include resource IDs
- Split cost allocation data <It's important to enable it for the ECS and EKS AWS Services relevant to your environment>
- Refresh automatically <AWS applies refunds, credits, or support fees to your account after finalizing your bill>
- Hourly collection
- Overwrite existing report
- Enable report data integration for: <leave blank>
- Compression type: Parquet / GZIP (Parquet preferred)
More information about enabling the cur can be found at https://aws.amazon.com/aws-cost-management/aws-cost-and-usage-reporting/faqs.
2. Cost Allocation Tags have been enabled.
Please see "Enabling Cost Allocation Tags" for further details. Vega recommends enabling (at a minimum):
- Environment Tags
- Application Tags
- Organization or Logical Business Grouping Tags
- Ownership Tags
- AWS Auto Scaling Group Name Tag
- AWS "Created By" Tag
Please create additional Tags to align with the financial reporting needs of your organization.
3. The S3 bucket ARN of the buckets the AWS CUR are exported to.
If you need any assistance actioning the prerequisites, please contact your Vega representative.
Deployment
The following steps walk through the deployment of the Vega AWS MPA CFT to your cloud environment.
1. Log into your AWS Master Payer Account (MPA)
2. Navigate to the CloudFormation Product Page
This can be done by typing CloudFormation into the search bar at the top of the screen then clicking on the CloudFormation Service.
3. Create a CloudFormation stack
On the top right of the CloudFormation Service Screen click the "Create stack" dropdown and select "With New resources (standard)".
4. On the "Create stack" Page Select:
- Template is Ready
- Upload a template file from saved CFT Location
- Click Next
5. On the "Specify stack details" page:
- Enter a stack Name: "VegaMPAAccess"
- Enter your CUR Bucket ARN and ARN/* Record
- This is a comma-separated field; you will need to enter the Bucket ARN and the Bucket ARN +
/*to grant us access. You can add other buckets using the same methodology. For example:arn:aws:s3:::your-bucket,arn:aws:s3:::your-bucket/*(Please note you can add multiple bucket & object references in this field.)
- This is a comma-separated field; you will need to enter the Bucket ARN and the Bucket ARN +
- Enter the "ExternalID" Provided by the Vega Team. This should be already pre-filled in the CFT.
- Enter "True" or "False" if you would like to Enable the FinOps Actions Policy (Default: False) and click "Next"
- On the Configure stack options click "Next"
- Review all configurations
- Click the acknowledgement that AWS CloudFormation will may create IAM resources
- Click Create Stack
- A successful deployment of the stack will result in a Status of "CREATE_COMPLETE" on the CloudFormation Stack page next to the name of your AWS Cloud Formation Stack Name.
- After deploying, please reach out to the Vega team informing them of the successful deployment and the Vega Team will verify access and start ingesting data.
Enabling Cost Allocation Tags
- Navigate to the "Cost Allocation Tags" tab on the left hand side.
- Ensure all of your corporation's required tags are marked as "active", if not please activate those tags.
- In addition to any corporate standard tags please ensure that any application, environment, ownership, or logical business grouping tags are enabled.
If you have any questions, please contact your client success manager.
Step 2: Add the Master AWS Payer Account to the Vega Platform
This is the AWS management account, which owns the organization and provides consolidated billing.
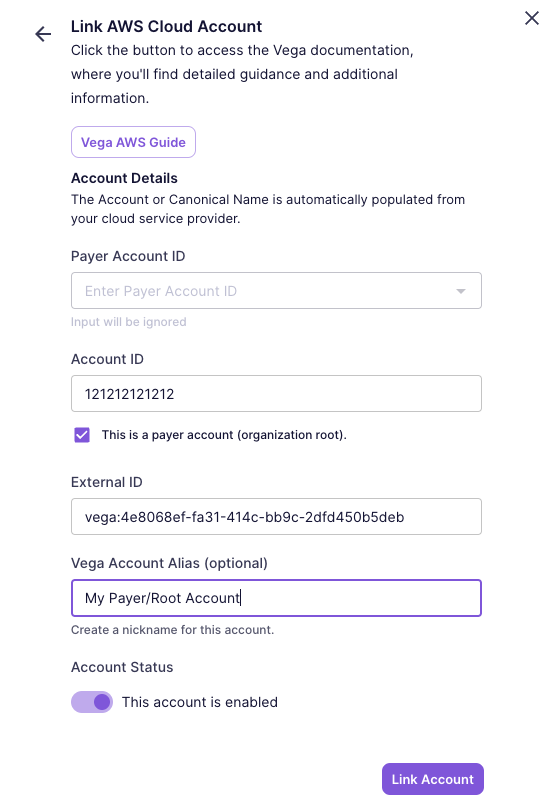
- Go to Settings and Add a Provider Account.
- Enter your Master AWS Payer Account information in the dialog.
note
Ensure you have selected the "This is a payer account(organization root)" checkbox.

- Click
Link Accountto link the account and start the discovery process.
Step 3: Add the AWS Accounts you would like to be discovered by the Vega Platform
These are your AWS Organization's member accounts, which run workloads and host resources.
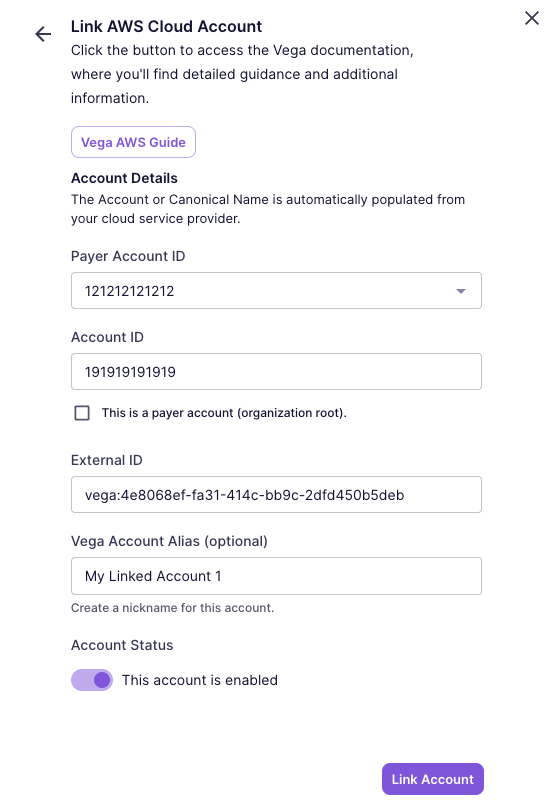
- Go to Settings and Add a Provider Account.
- Enter your AWS Linked Account information in the dialog.
note
Select a valid "Payer Account ID", then enter the "Account ID" for the Linked Account.

- Click
Link Accountto link the account and start the discovery process.
Ensure that you complete Step 4 below so the Vega Platform has the correct permissions to connect to your Linked Accounts!
Step 4: Configure your Linked AWS Accounts Permissions
You will need to run the appropriate Linked Account CFT in each of your organization member accounts. This CFT will grant Vega Cloud access to your AWS Linked Accounts for the purpose of collecting resource configuration data to support our analysis & recommendations.
Vega Cloud's CFTs create specifically named AWS Roles. These roles are required for Vega Cloud to collect data from your AWS Accounts. Please do not rename or delete these roles. If you have any questions, please contact your Vega Cloud Customer Success Manager.
Deployment Strategies
There are two ways to deploy the CFT to your AWS Linked Accounts:
- CloudFormation Stack -- You can manually deploy the CFT to each of the AWS Linked Accounts we'll be monitoring.
- Cloudformation StackSet -- You can use CloudFormation StackSets to deploy the CFT to some or all of your AWS Linked Accounts in one operation. This is the recommended approach if you have a large number of AWS Linked Accounts.
Understanding the Linked Account CFTs
The specific access requested in the CFT can be modified to meet each team's level of risk aversion, but out of the box does the following:
For customers who have purchased the Inform and Optimize SKUs, the following role is created:
- Creates a role (VegaDiscoveryReader) which will grant the Vega Platform access to the account and sync data into the Vega ecosystem.
For customers who have purchased one of our Operate SKUs, the following roles are created:
- Creates a role (VegaDiscoveryReader) which will grant the Vega Platform access to the account and sync data into the Vega ecosystem.
- Creates a role (VegaOptimizer) which will grant the Vega Platform access to the account and perform actions on your behalf such as parking/unparking resources, snapshotting disks, and rightsizing instances.
The CFTs includes a required parameter that will need to be defined during deployment:
- ExternalId: Vega Cloud's ExternalId for your environments (helps to authenticate role assumption). This will be provided by your Vega Team in your welcome email.
FAQ
Q: I don't understand how any of this works. What's the easiest way to set this up?
Vega's customer success team is here to help! Vega will walk your teams through making the configuration changes needed, answer any questions you might have, and get you up in running in under 30 minutes on average.
Q: Where can I find the CloudFormation Templates listed above?
All of the latest templates can be found on this documentation site here or on the Vega GitHub.
Q: I would like to limit permissions around certain resources. Will Vega still function?
Most likely, yes however please reach out to your Vega representative to confirm whether there will be any impact to the details in the Vega reports, recommendations, or automations.