Bulk Upload for Provider Accounts
About Bulk Upload for Provider Accounts
Bulk Provider Upload allows the creation of a large volume of Provider Accounts by populating a CSV file, each row representing the details for an individual account. It is important to understand the required format for each of the different CSV Templates, as each provider requires specific configuration. See the CSV Template Formats section for more details on each provider type.
How to Bulk Upload
-
Click the
+ Accountbutton. -
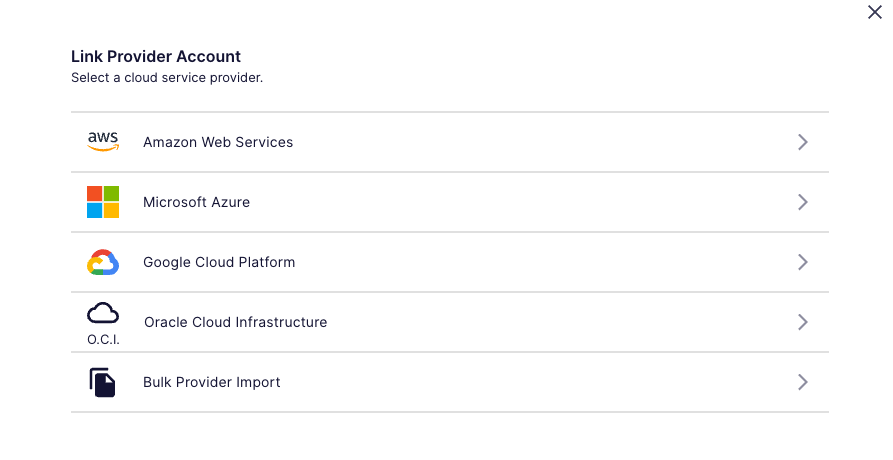
In the dialog, select
Bulk Provider Import.
-
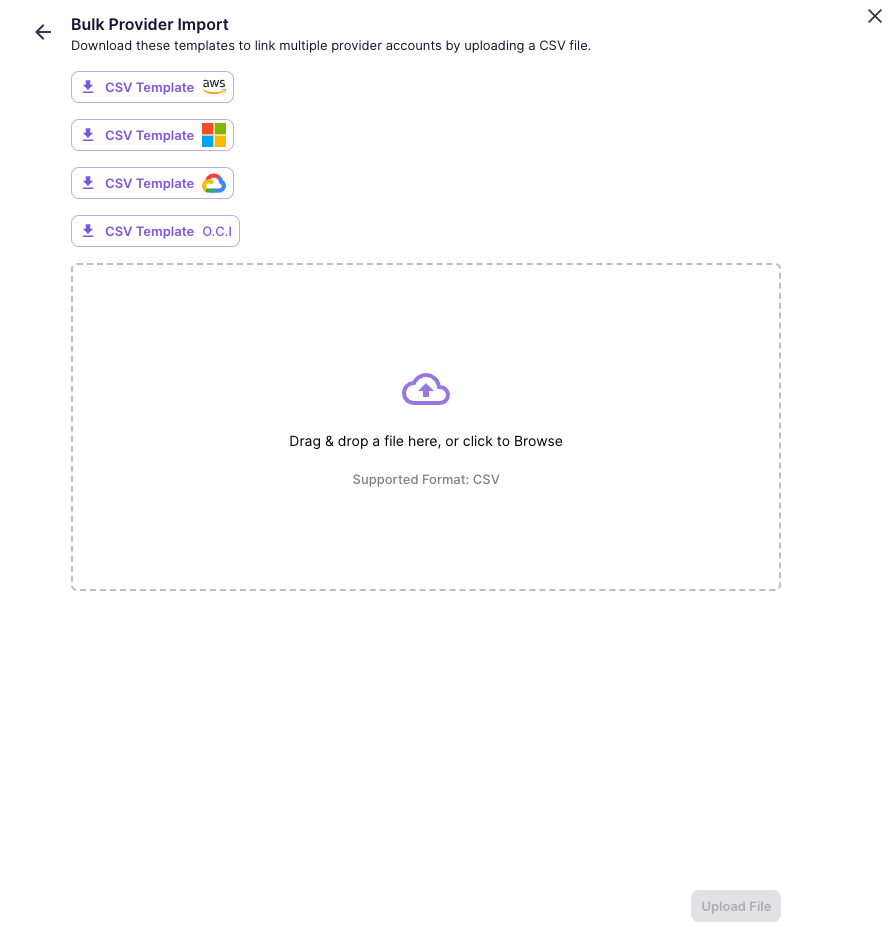
The next dialog will show a downloadable CSV Template for each provider type (AWS, Azure, GCP, and OCI).

-
Download the appropriate CSV Template.
-
Fill out the CSV Template with the appropriate provider account information. More detailed instructions for each provider are listed in the sections below.
-
When the CSV Template is complete, return to the above dialog to upload your file in the section that says "Drag & drop a file here, or click to Browse".
Tip: Bulk Upload File Specifications- Accepted file type:
.csv - Max bulk upload file size is
20 MB. - The file name must be between 1 and 200 characters long, contain only letters, numbers, underscores (_), or dashes (-) and must have a single valid extension.
- Accepted file type:
CSV Template Formats
Amazon Web Services (AWS) CSV File Format
Required Fields:
AccountID: The AWS account ID.AccountName: The name of the AWS account.PayerAccountID: The AWS payer account ID (if applicable). If thePayerAccountIDis omitted in a row, this row will be treated as a payer account and will be detected and created before all other rows (linked accounts). Otherwise, if thePayerAccountIDis present, the row will be processed as a linked account.ExternalID: The external ID used for cross-account access.
Example:
AccountID,AccountName,PayerAccountID,ExternalID
513971506177,DPZ Dev Account,,vega:370c4171-6597-4a3f-a453-64852a0374fb
509819156868,automated test,513971506177,850120924120Test
Tips:
- Ensure
AccountIDandAccountNameare correctly filled. PayerAccountIDis optional, but needs to be present if the account is NOT a payer account. If blank, the row will be treated as a payer account, like the first row in the example.- Double-check the
ExternalIDfor correctness.
Azure CSV File Format
Required Fields:
subscriptionId: The Azure subscription ID.subscription: The name of the Azure subscription.clientId: The Azure client ID.clientSecret: The secret value for the client ID.tenantId: The Azure tenant ID.
Example
subscriptionId,subscription,clientId,clientSecret,tenantId
a72cf362-8598-4dbe-9969-eebb11e1e339,vegademo-account5,2bee22c5-c076-4840-a8ae-b27803d1fd8c,.5k8Q~oI23cc7cT15_nf~y~1z5IP2TePgJAgodpx,f9c4d40e-8320-4267-8ee3-e1fa7f087447
Tips:
- Double-check for accuracy in the
subscriptionId,clientId,clientSecret, andtenantId.
Google Cloud Platform (GCP) CSV File Format
Required Fields:
type: The type of resource (e.g.,service_account).project_id: The unique identifier for the GCP project.project_name: The name of the GCP project.private_key_id: The identifier for the private key.private_key: The actual private key.client_emailclient_idauth_uritoken_uriauth_provider_x509_cert_urlclient_x509_cert_urluniverse_domain
Example
type,project_id,project_name,private_key_id,private_key,client_email,client_id,client_x509_cert_url,auth_uri,token_uri,auth_provider_x509_cert_url,universe_domain
service_account,vega-test-project,Vega Test Project,0ddc4b8c706a9b4685479882b75c92603957ae39,-----BEGIN PRIVATE KEY-----\nMIIEvQIBADANBgkqhkiG9w0BAQEFAASCBKcwggSjAgEAAoIBAQC4Jx0QPk//GcLJ\no4LT2RY63/xWV0eD50GvC3xa6wn1woVo6ohwCRARq5CLBNkIMl3lg9IXDs0BIgYI\nRpiWDnMte+DXE3Bh2XWVZw8KxItlLlskYBnkuRBISdHQVVSn/zy/Op+9w73atUWF\nI3p4G7CEXIHMmQzWbIsYkSi11xNA7fCOIGD4kKWxh3597bTV7zcexkb9Hii7ELAc\ntBS4B+K5iU5kINzNsHkgAD54P1HVXYE/hRbgB5vmlJaQC1HN0BuVzQ1LEJ17ZlAx\nyshHQ4NnX8NrDvfagv19ptTu42mlVR7fXH3gSqBfJCvvQMKIwwVOoOrP3uM7oGKe\nlTYGQY69AgMBAAECggEAMhOk0h13yIGbWBTIR06RvnnZVytNzb8tu+mOK/UdVMDM\nYY7hgkHcpkl2uW8ci5+NOTAVALIDKEY/F4QauuVUWpgWL8BwpYd7c\ntwQRFoMCu/2i+hmyNyrvvHq3JLXdY2OG36EZtR6mfh/fxiDaflau7oPOw8AUQsPb\nRzLYxXuKbHa19AtdltUbcFokjhfcmLUzMQtzjdu28mJRFc0NhiZqApSF9BGVLyAf\njB2HsAH97TerqLfv9COiBEsxC6QeijOPdR0C8QkvHyZiB+GwrtqT2wNvcxFnckkd\n9EvrOuSwtW8oLlTbsHhKeHIXuxjyoh6SvtiwE7U0ewKBgQDiBa8bNc27M+bspnw1\nLj0roNNWzCBr8Hn7gJbcfTznU4qreRDLHZeceyxDB8Y3XxxAOSasdmnsjjUQLLsf\nsADzybFLzO4xKs++cjVaannxj+8jcOIwTMyTztmgIw8IuH7MONxCUaqBCM9tl6Uw\ntLCAB9VMMvtzIExWVUzqWxg/RwKBgQDQk82aE6FITmxIkiaZbfuLhl9oP3b60SgB\nb42JHNiLig+CFghfRMA1QJ6fxu0jNtZvkfatRbr9ZIRfQpqAciZu1r4SXkOaV38C\nTN4toVDamdvIY3F4bqyG5F7V98Bu3QN7YB9+TiaaXm1tdHVlLaS/JCdxdkJe53KE\ndH/dzUmr2wKBgQC1GFTK+nsSiW13I5XVjmzYrg1nODqqAY3bI5a8p2PK/TbYWTJJ\nbDZz3IUEWBBLgVtDYgdIm8AXF4IQqaZspzq8GliCIXqfzmuRbjStcy6ti+PRg7rX\ndFFeBJh+JFkBZcHCo7RnNsPki0iXyK9ErSHWE3ClkxvBjJldew8bn014NQKBgDs4\nvDfzOuf83GH+nVcTE0kabhx7aJzuph1CPz2fIxz7pkuZVec27hwwrNlQ8iP9fgVP\nvGqWUfGAiNVDY/r0blUqQ+2TNj6seTN9/9eU5hArf2v2UFGRmwrx7Lt0DP9tYX+2\nWzrRlcRe61MYrfx8aTqcWVat7UplDO7u5R9lGnXhAoGAJtRiXrIrpOuxcmQmSYry\nhCKjqttIKtTtRmXtOlIc9Y3wNSLflzvv8ZzcfRNiL9j479wL+pZpOSsJ1mEG/+W2\n1ntZ/WTmw9Qef1l0JXoEiQSWcdrjpaS7A23WvBSSOP9ioVHJ4okeOyVBbEg9BRWx\ndNmXD8mQw6IYU0vIdB0qNrM=\n-----END PRIVATE KEY-----,veg-test@test-122307.iam.gserviceaccount.com,12345678919265922133,https://accounts.google.com/o/oauth2/auth,https://oauth2.googleapis.com/token,https://www.googleapis.com/oauth2/v1/certs,https://www.googleapis.com/robot/v1/metadata/x509/vega-test%40test-122307.iam.gserviceaccount.com,googleapis.com
Tips:
- Ensure the
private_keybegins with-----BEGIN PRIVATE KEY-----and ends with-----END PRIVATE KEY-----. - Replace any newline characters in the
private_keywith\n.
Oracle Cloud Infrastructure (OCI) CSV File Format
Fields:
Option 1 - If the desired OCI Compartment is the root Compartment:
compartment_idThe OCID of the desired Compartment. MUST BE THE SAME AStenancy_id!tenancy_id: The OCID of the Tenancy that the Compartment resides in. MUST BE THE SAME AScompartment_id!parent_compartment_id: LEAVE AS EMPTY VALUEprivate_key_content: The content of the private key downloaded.fingerprint: The fingerprint of the Private Key file.home_region: Home Region ID of the root Compartment.user_id: The user OCID created.vega_account_alias: An optional name to give your Provider Account.
Option 2 - If the desired OCI Compartment is a child Compartment:
compartment_idThe OCID of the desired Compartment.tenancy_id: The OCID of the Tenancy that the Compartment resides in.parent_compartment_id: The OCID of the direct parent Compartment.private_key_content: The content of the private key downloaded.fingerprint: The fingerprint of the Private Key file.home_region: Home Region ID of the root Compartment.user_id: The user OCID created.vega_account_alias: An optional name to give your Provider Account.
Example
The first row in the CSV is an example of Option 1, and the second is an example of Option 2.
compartment_id,tenancy_id,parent_compartment_id,private_key_content,fingerprint,home_region,user_id,vega_account_alias
ocid1.tenancy.oc1..fakeid1,ocid1.tenancy.oc1..fakeid1,,-----BEGIN PRIVATE KEY-----\nMIIEvQINOTAREALPKLFs4niu/8jrOE=\n-----END PRIVATE KEY-----,00:00:00:00:00:00:00:00:00:00:00:00:00:00:00:00,us-phoenix-1,ocid1.user.oc1..fakeid3,OCI Root Compartment test option 1
ocid1.compartment.oc1..fakeid1,ocid1.tenancy.oc1..fakeid2,ocid1.tenancy.oc1..fakeid3,-----BEGIN PRIVATE KEY-----\nMIIEvAINOTAREALPKLWhNEQ==\n-----END PRIVATE KEY-----,00:00:00:00:00:00:00:00:00:00:00:00:00:00:00:00,us-phoenix-1,ocid1.user.oc1..fakeid4,OCI Child Compartment test option 2
Tips:
- Ensure the
private_key_contentbegins with-----BEGIN PRIVATE KEY-----and ends with-----END PRIVATE KEY-----. - Replace any newline characters in the
private_key_contentwith\n.
General Tips for All CSV Files:
- Use a text editor or a CSV editor to edit the CSV files. Not Excel.
- Do not include extra spaces before or after the commas.
- Each account must be on one line, ‘\n’ is fine like in the gcp ‘private_key’
- Ensure each row contains the correct number of fields.
Validate the CSV file format before uploading to reduce errors.
What not to do, Examples of incorrect formats
Incorrect AWS CSV File Format
- Example:
AccountID,AccountName,PayerAccountID,ExternalID
,TestaccountA,abc1234567879,supersecretkeyofdoom
XYZ9876543210,,abc1234567879,supersecretkeyofdoom
XYZ9876543211,TestaccountC,abc1234567879,
- Why it is wrong:
- In the first row, the
AccountIDis missing. The account ID is a mandatory field for identifying the AWS account. - In the second row, the
AccountNameis missing. The account name is required for easy identification of the account. - In the third row, the
ExternalIDis missing. This field is essential for cross-account access and should be provided.
- In the first row, the
Incorrect Azure CSV File Format
- Example:
subscriptionId,subscription,clientId,clientSecret,tenantId
sub_id_1,MySubscription1,client_id_1,,
sub_id_2,MySubscription2,,secret_value_2,tenant_id_2
- Why it is wrong:
- In the first row, the
clientSecretandtenantIdare missing. All fields are required for each subscription. - In the second row, the
clientIdis missing. This is a crucial field for Azure provider account creation.
- In the first row, the
Incorrect GCP CSV File Format
- Example:
type,project_id,project_name,private_key_id,private_key,client_email,client_id,client_x509_cert_url,auth_uri,token_uri,auth_provider_x509_cert_url,universe_domain
service_account,my_project_1,,pk_id_1,pk_value_1,client_email_value_1,client_id_value_1,client_cert_url_value_1,auth_uri_value_1,token_uri_value_1,auth_provider_cert_url_value_1,univers_domain_value_1
service_account,my_project_2,MyProject2,pk_id_2,"{
  \"type\": \"service_account\",
  \"project_id\": \"my_project_2\",
  \"private_key_id\": \"pk_id_2\",
  \"private_key\": \"-----BEGIN PRIVATE KEY-----\\nMIIEvgIBADANBg...\\n-----END PRIVATE KEY-----\\n\",
  \"client_email\": \"service-account@example.com\",
  \"client_id\": \"1234567890\",
  \"auth_uri\": \"https://accounts.google.com/o/oauth2/auth\",
  \"token_uri\": \"https://oauth2.googleapis.com/token\",
  \"auth_provider_x509_cert_url\": \"https://www.googleapis.com/oauth2/v1/certs\",
  \"client_x509_cert_url\": \"https://www.googleapis.com/robot/v1/metadata/x509/service-account%40example.com\"
}",client_email_value_2,client_id_value_2,client_cert_url_value_2,auth_uri_value_2,token_uri_value_2,auth_provider_cert_url_value_2,univers_domain_value_2
- Why it is wrong:
- In the first row, the
project_namefield is missing, which is a required field. - In the second row, the
private_keyfield contains a multi-line JSON string, which is not the expected format. Theprivate_keyshould be a simple private key string, beginning with-----BEGIN PRIVATE KEY-----and ending with-----END PRIVATE KEY-----, without any additional JSON structure. Including a full JSON credential file here is incorrect and will result in parsing errors.
- In the first row, the
This example highlights the importance of adhering to the expected format for each field in the CSV file. Mixing formats or including unnecessary or incorrect data types can cause the parsing process to fail, leading to errors in the bulk upload process.
General Mistakes to Avoid:
- Leaving mandatory fields empty. Every field in the CSV is essential for the creation of provider accounts.
- Using incorrect or placeholder data in important fields like IDs, keys, and secret values.
- Including extra spaces or characters that can cause parsing errors.
- Failing to follow the specified format, such as the proper structure for private keys in GCP.
- Mixing up field values, such as putting a client ID in the subscription ID field.
It's crucial to carefully review and validate the CSV files before uploading to ensure that all required information is accurate and complete. This will significantly reduce the likelihood of errors during the bulk upload process.