Enterprise Scheduler
About Enterprise Scheduler
Cloud's metered usage offers the benefit of only paying for resources when in use, however a common challenge faced by many organizations is identifying, orchestrating, and enforcing the means for powering off resources that do not require persistent runtimes (e.g. test and dev environments).
Vega Enterprise Scheduler is a cloud scheduling software designed to optimize cloud resource utilization and minimize costs through the automation of powering off and on cloud resources. With Enterprise Scheduler, users are able to set and assign schedules according to their anticipated run patterns using a simple user interface to avoid generating unnecessary waste without a complicated workflow.
Creating an Enterprise Schedule
To develop an Enterprise Schedule the user will turn to the upper right of the screen and click “+Create”. The user will have the opportunity to create a Schedule for individual resources or an Advanced Schedule to create priority grouping of resources, start/stop one or more resources in a defined sequence. Click ‘Schedule’.
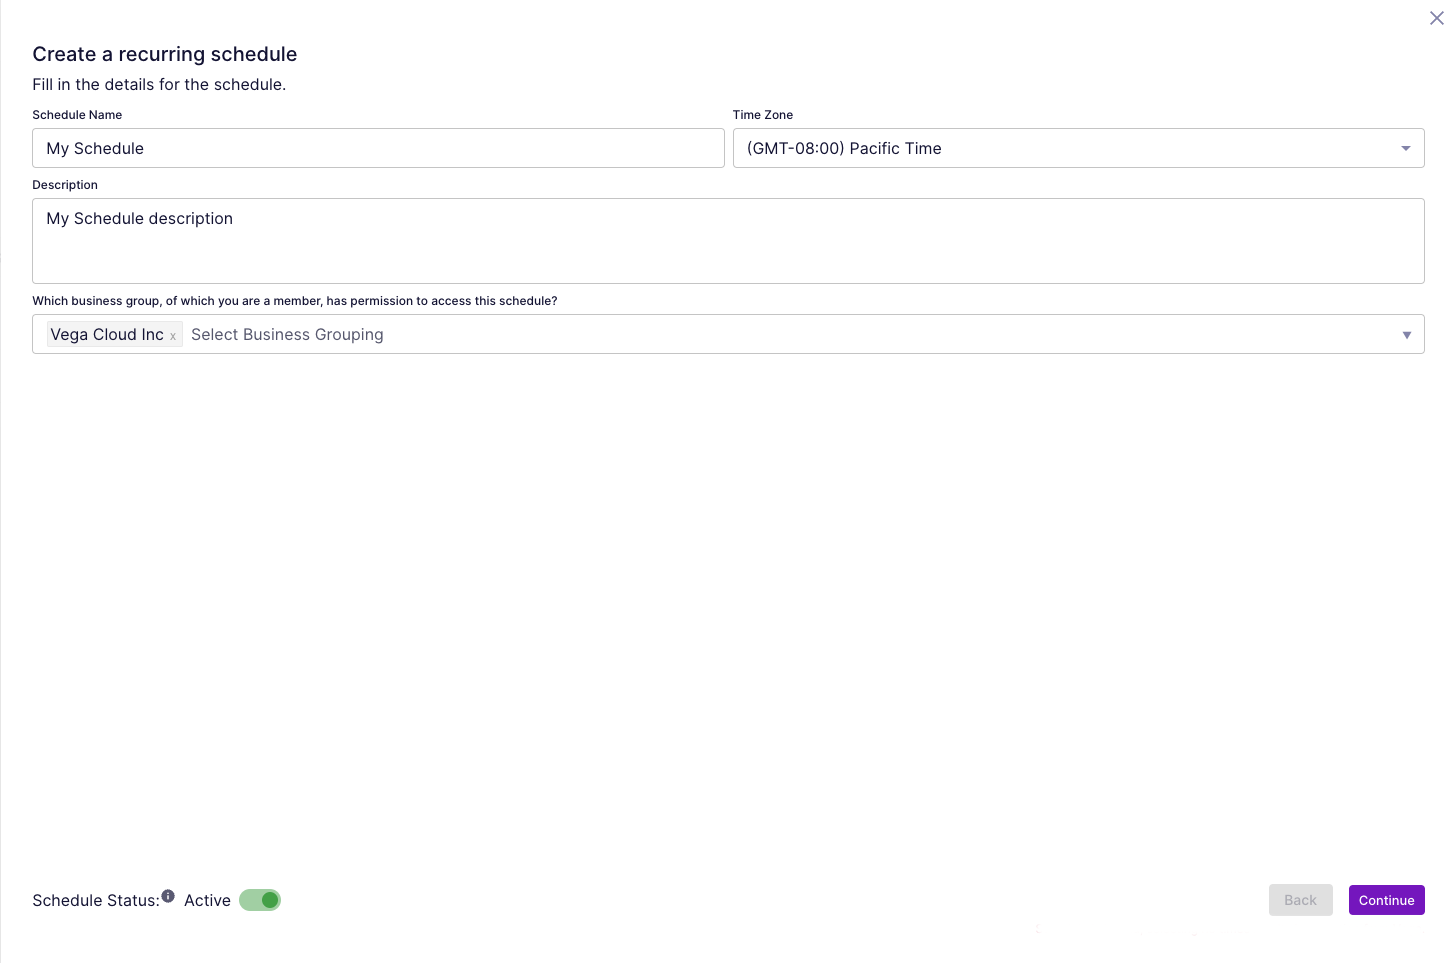
The user will be prompted to fill in details for the schedule by entering a Schedule Name, selecting a Time Zone, assigning a Business Group, and adding a Description of the schedule. Before continuing, confirm the Schedule Status in the bottom left by toggling On or Off. When toggled on, the schedule is active and will be executed during the selected times in the schedule. When toggled off, the schedule is inactive and will not be executed even at selected times (the user will have an opportunity to turn the schedule on or off in the main schedule listing after the schedule is created.) Once filled in, click ‘Continue’.
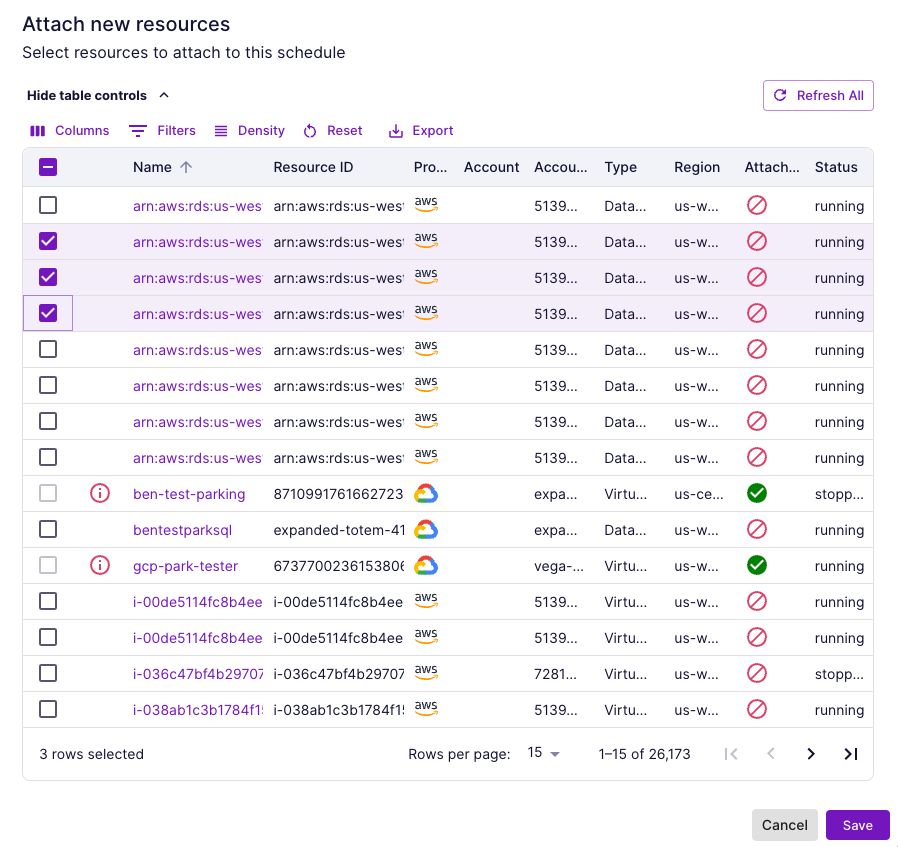
Select resources to attach to the schedule by clicking “Attach Resources”. Click ‘Save’.
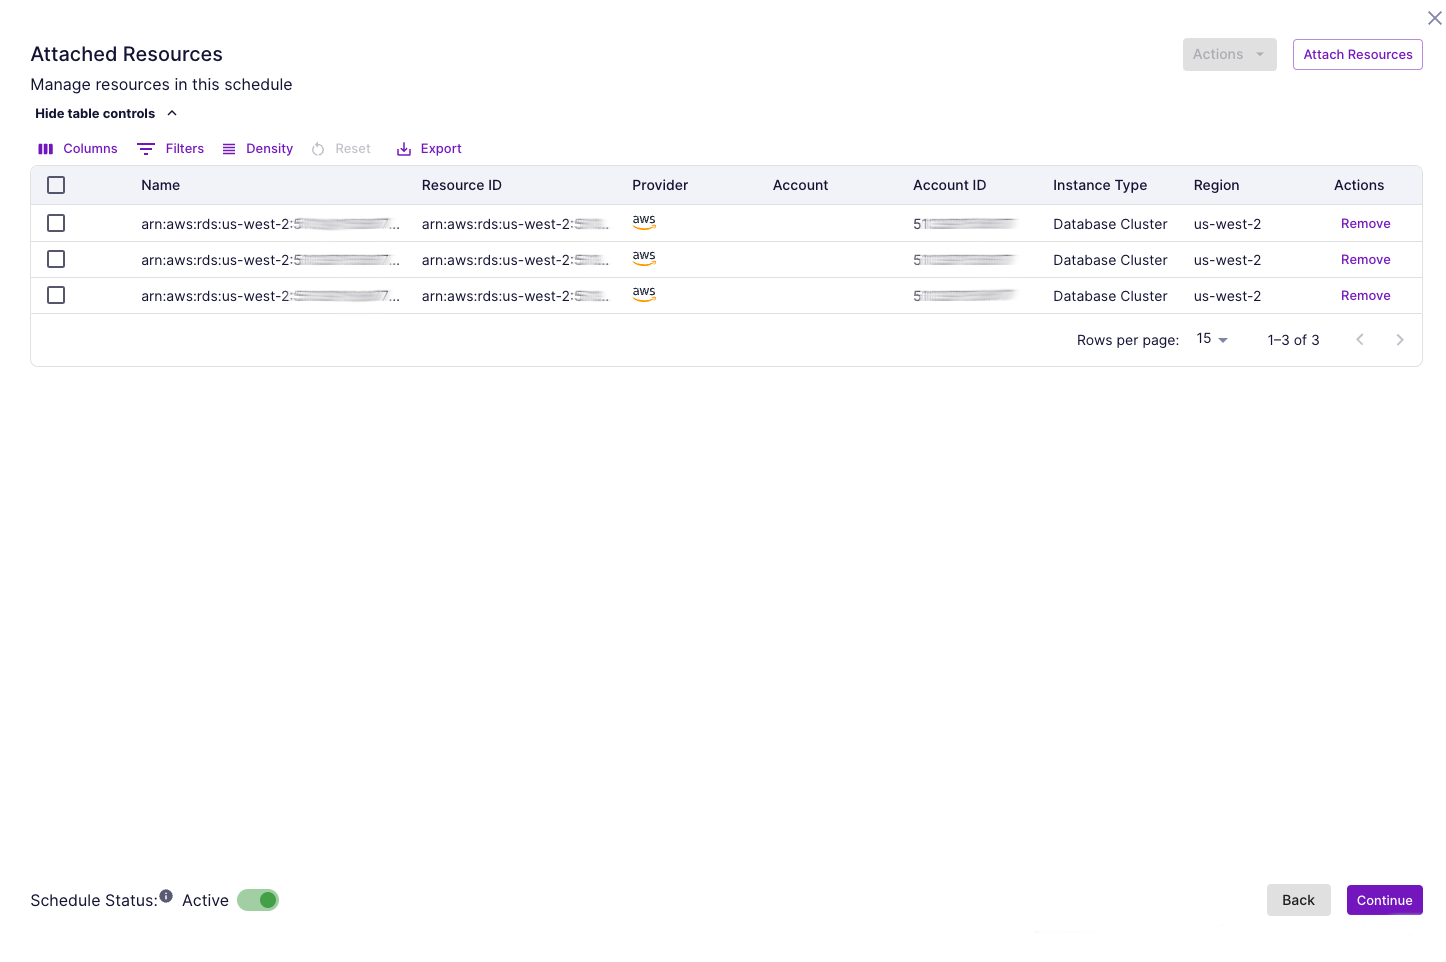
Review your selections and click 'Continue'.
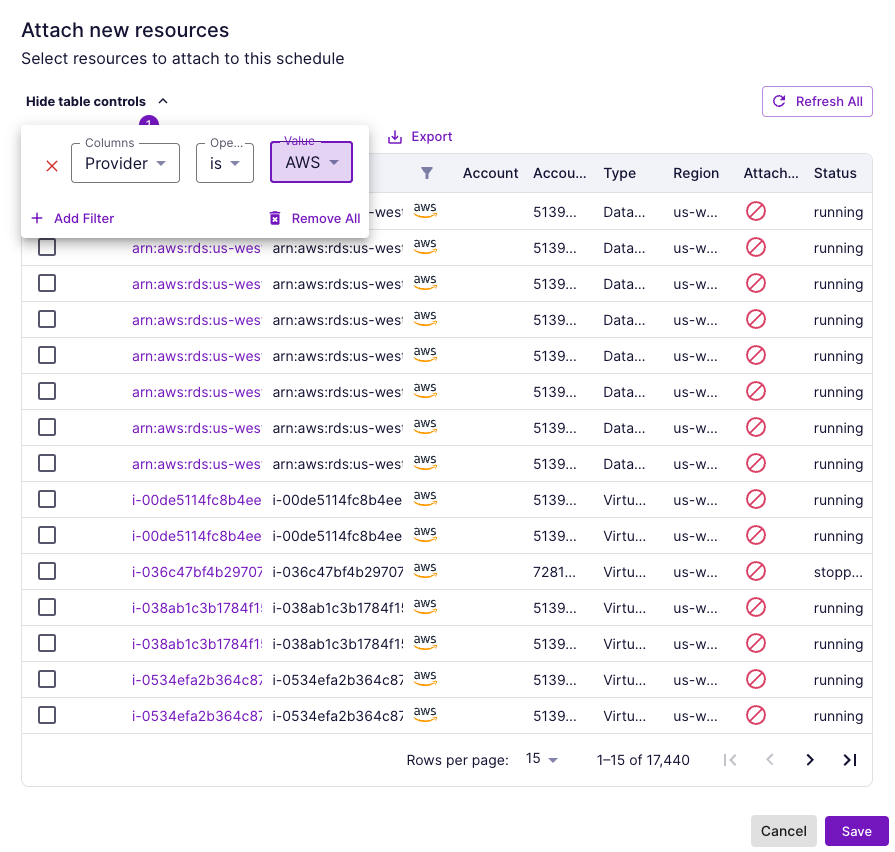
While attaching resources, the user can filter the resource table by: Name, Resource ID, Provider, Account, Account ID, Type, Region, Attached to Schedule and Status.
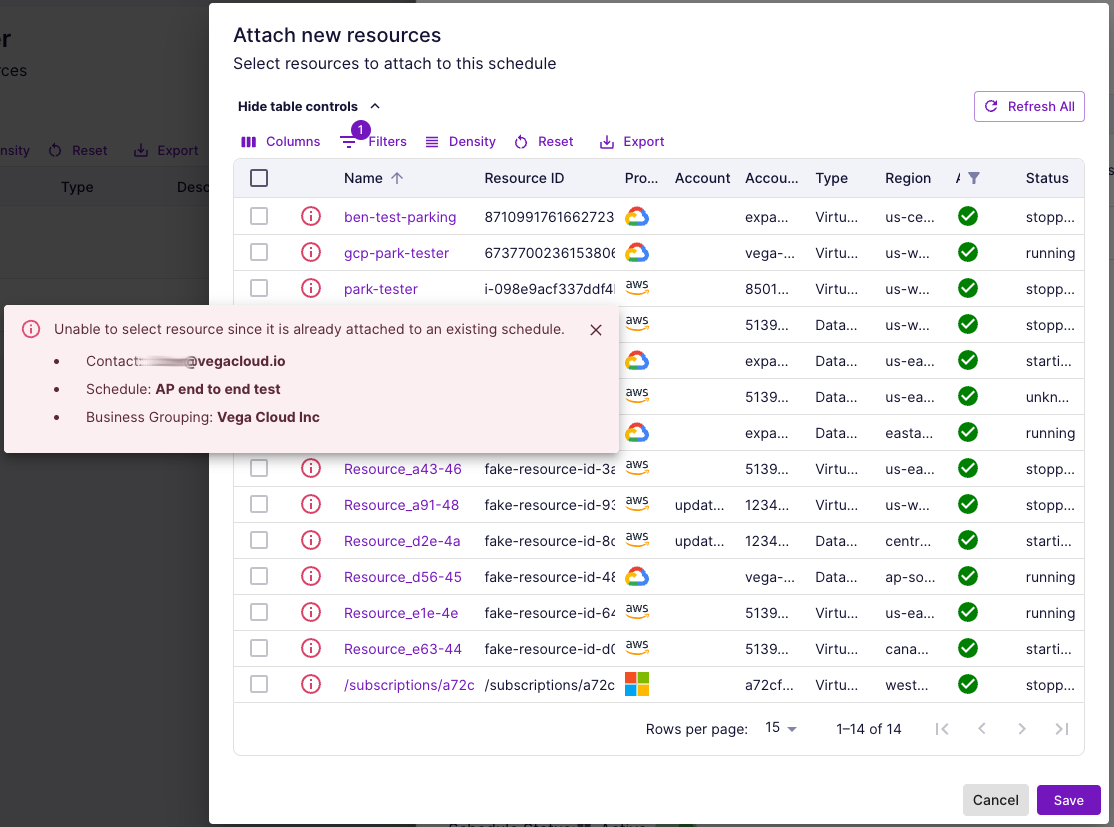
A resource can only be attached to one schedule at a time. Some resources may not be selectable because they are already attached to an existing schedule. This is indicated by a red informational icon, as well as the row being disabled for selection. Clicking on the red informational icon will provide a contact, schedule name, and business grouping related to that resource.
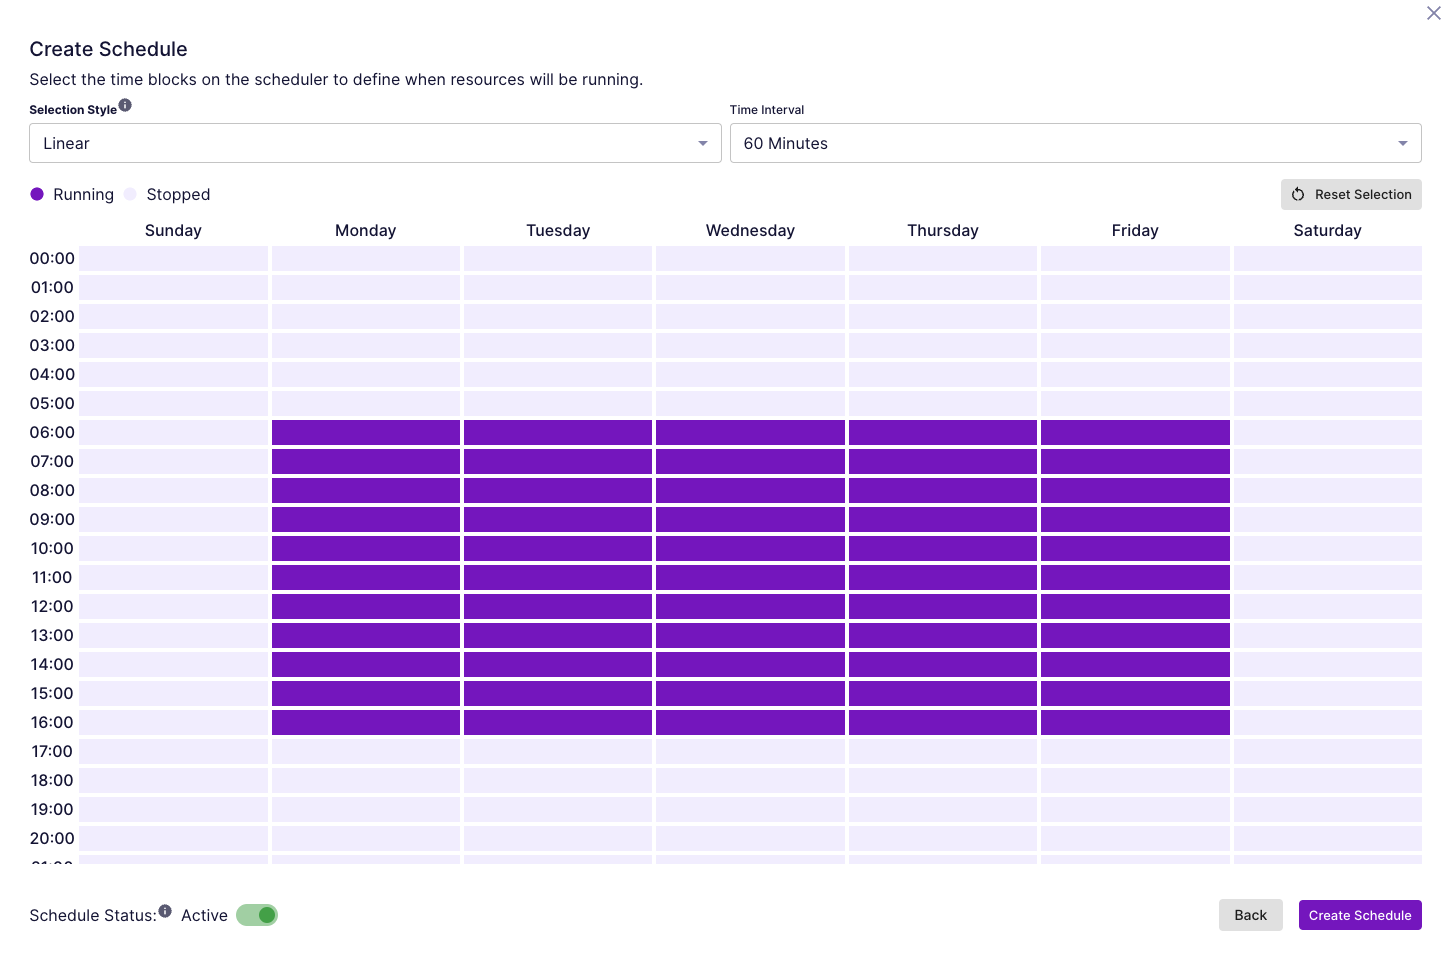
Create Schedule by selecting Linear or Square selection style for the schedule. The user can select the interval time in either 60 minutes, 30 minutes, 15 minutes, or 5 minutes for more granular scheduling. Remember what is highlighted is RUN time. Unhighlighted areas indicate when the resources will be stopped.
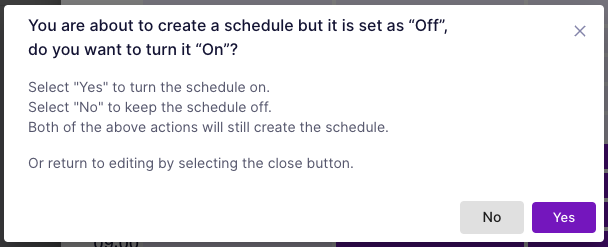
Once the schedule is ready, click ‘Create Schedule.’ If the schedule status toggle is off, the user will see a pop-up confirming.
The schedule can be accessed from the main Enterprise Scheduler page with multiple options to enable/disable the schedule, edit, delete, or add advanced scheduling.
Creating an Advanced Enterprise Schedule
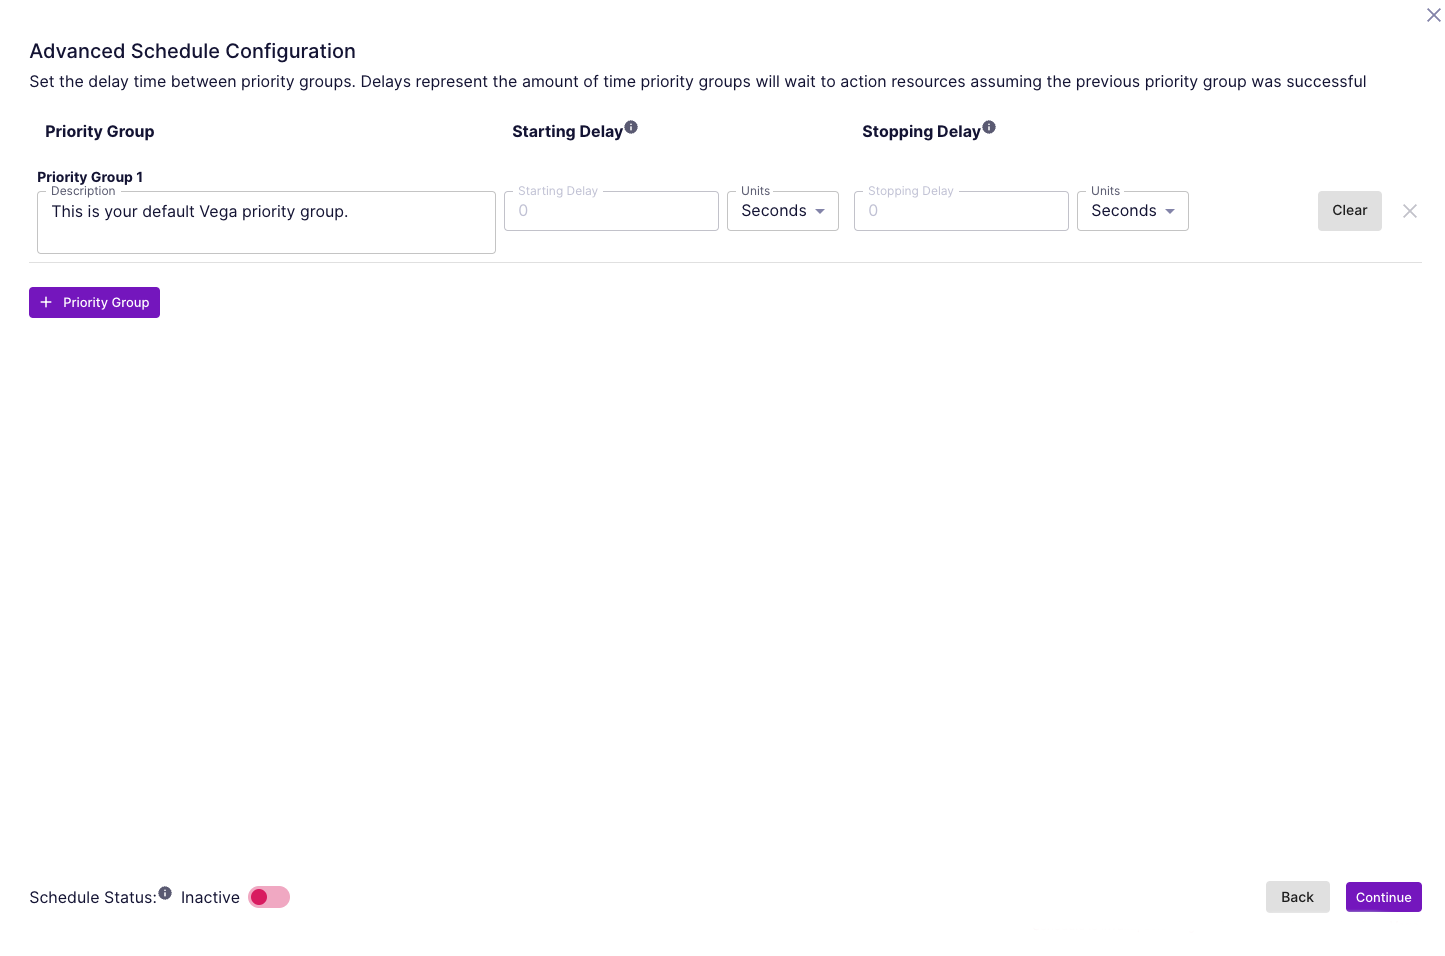
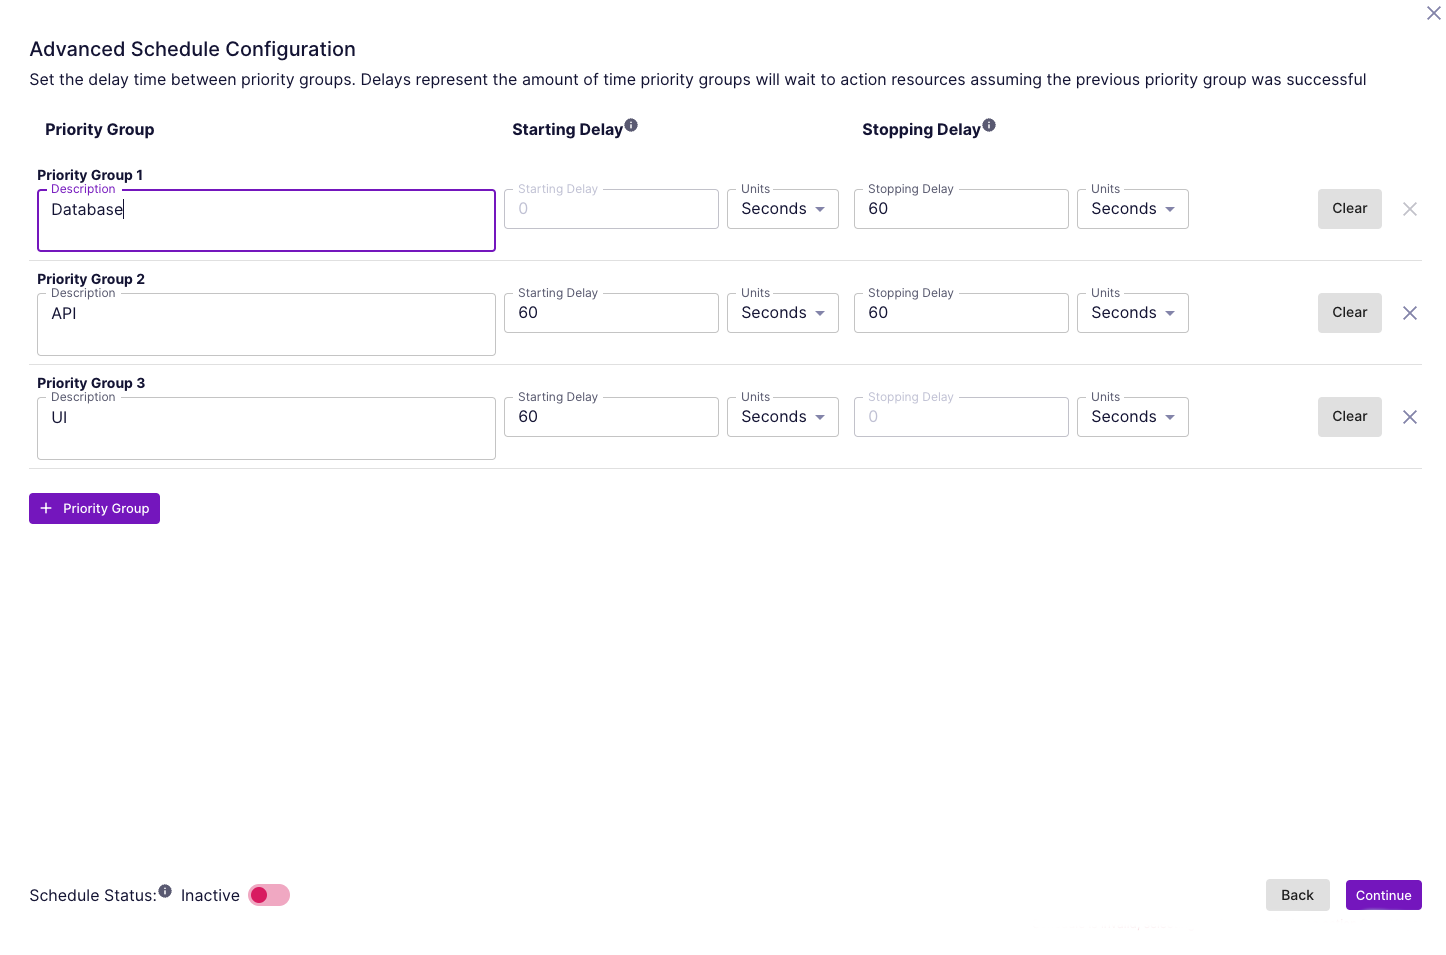
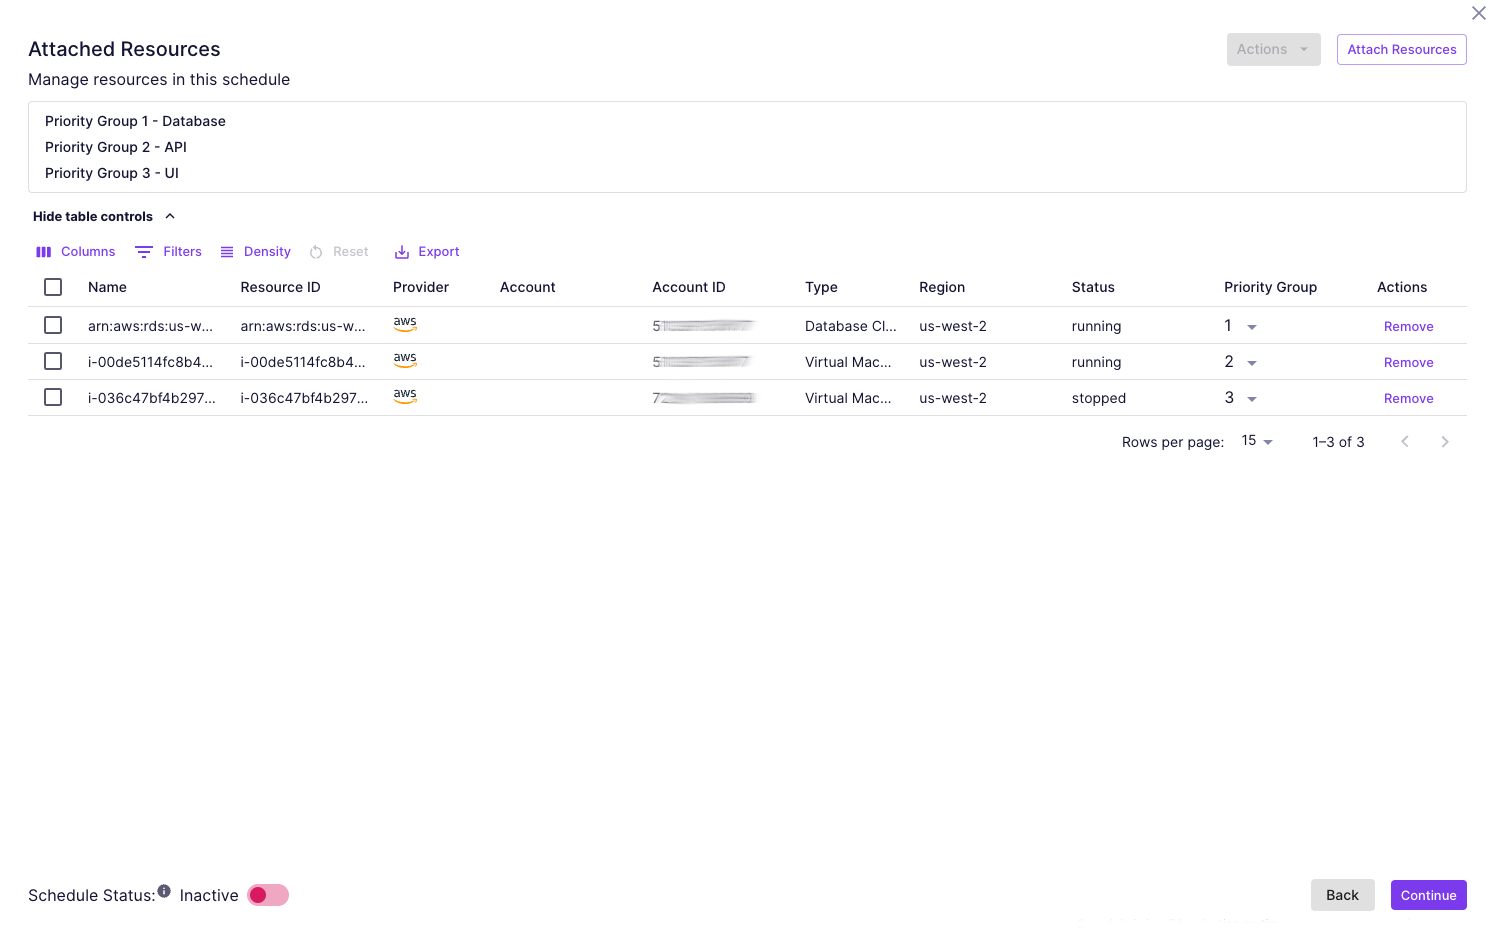
Advanced Schedule allows the user to group resources by priority and set a delay time between priority groups. Delays represent the amount of time priority groups will wait to action resources assuming the previous priority group was successful. After entering the details for the schedule, the user will be asked to create priority groups and set the Starting Delay and Stopping Delay by seconds or minutes. The Starting Delay order will start from the first priority group to the last priority group. The Stopping Delay order will start from the last priority group to the first.
Enter a description for each priority group (e.g., Priority Group 2, description is “API”).
Assign resources by attaching them to appropriate Priority Group number by the dropdown. While attaching resources the user can filter the resource table by: Name, Resource ID, Provider, Account, Account ID, Type, Region, Attached to Schedule and Status.
Create Schedule by selecting Linear or Square selection style for the schedule. The user can select the interval time in either 60 minutes, 30 minutes, 15 minutes, or 5 minutes for more granular scheduling. Remember what is highlighted is RUN time. Unhighlighted areas indicate when the resources will be stopped.
Once the schedule is ready, click ‘Create Schedule.’ If the schedule status toggle is off the user will see a pop-up confirming. The advanced schedule has now been created.
Disable Between
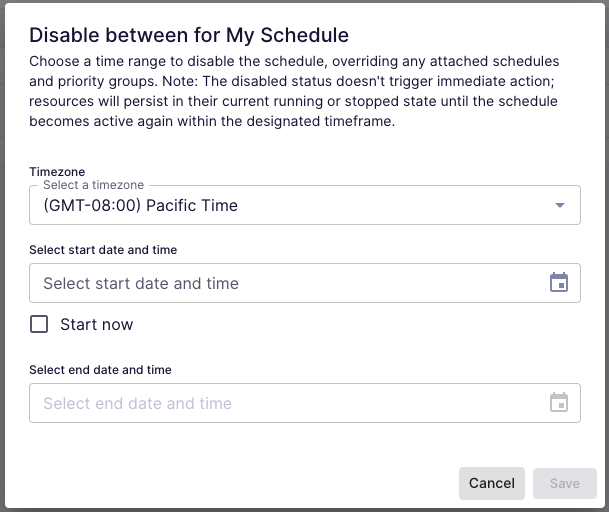
Ability to override an Enterprise Schedule with the Disable Between functionality. Choose a time range to disable the schedule, overriding any attached schedules and priority groups. The disabled status does not trigger immediate action. Resources will persist in their current scheduled state until the schedule becomes active again at the end of the designated timeframe.
Creating a Disable Between
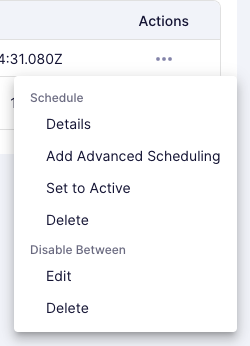
On the Enterprise Scheduler page, find a schedule and click on the gray icon in the "Disable Between" column, or click on "Create" in the Actions column under the "Disabled Between" menu header.
The gray color of the icon means that a "Disable Between" configuration has not been applied to the schedule.
Choose a time range to disable the schedule, overriding any attached schedules and priority groups. Click Save.
The "Disable Between" configuration should now be applied to the schedule.
The green color of the icon means that a "Disabled Between" configuration has been applied to the schedule and is in a current or future date range. Hovering over the icon will show the configured start and end times.
![]()
Editing a Disable Between
Find a schedule and click on the icon in the "Disable Between" column, or click on "Edit" in the Actions column under the "Disabled Between" menu header.
Make any desired edits and click Save.
Deleting a Disable Between
Find a schedule and click on "Delete" in the Actions column under the "Disable Between" menu header.
Click "Delete Disable Between" on the confirmation dialog to delete the Disable Between.
Expired Disable Between
A red icon in the "Disable Between" column means a configuration is expired for the schedule and is a date range in the past. Hovering over the icon will show the previously configured start and end times. You can then edit or delete the "Disable Between" configuration following the previous documentation.
The red color of the icon means that a "Disabled Between" configuration has expired for the schedule.
FAQ
Have a question about Vega Enterprise Scheduler? Please contact us at support@vegacloud.io or reach out to your Customer Success Manager for assistance.
- What Resource Types can Vega start and stop?
- AWS
- EC2 Instances (Elastic Compute Cloud)
- RDS Instances (Relational Database Service): Include PostGreSQL, MySQL, Oracle, MariaDB, Microsoft SQL
- RDS Clusters - Include Aurora PostGreSQL, Aurora MySQL, single-zone clusters
- Redshift Clusters
- EC2 Spot Instances: Spot Instances can be started or stopped if they meet the following criteria:
- They are EBS Backed
- The spot instance is of request type 'persistent' (not 'one-time)
- They are not part of an auto-scaling group
- Azure
- Virtual Machines
- GCP
- Instances
- SQL-Instances
You will see the platform state switch to the intended state shortly after the action is taken. However, Vega does not verify the state in GCP for SQL-Instances, so it is recommended to use appropriate delays between priority groups to ensure this resource gets started before any other resources that depend on it
- What are the limitations of stopping your AWS DB instance?
- The following are some limitations to stopping and starting an AWS DB instance due to AWS API restrictions:
- You can't stop a RDS for SQL Server DB Instance in a multi-AZ deployment.
- You can't stop a DB instance that has a read replica, or that is a read replica.
- You can't modify a stopped DB instance.
- You can't delete an option group that is associated with a stopped DB instance.
- you can't delete a DB parameter group that is associated with a stopped DB instance.
- In a Multi-AZ deployment, the primary and secondary Availability Zones might be switched after you start the DB instance.
- Can I Start or Stop individual resources?
- Yes, resources can be started or stopped in 'Resources' from the 'Actions' column.
- My resource is not turning on or off, what should I do?
- Check to make sure your cloud account in 'Settings' > 'Provider Accounts' is enabled. If the Provider Account is disabled, Vega will not take any actions against that account.
- Ensure the credentials for your provider are correct. You can check these in 'Settings' > 'Provider Accounts'. If the credentials are incorrect, Vega will not be able to take any actions against the account.
- Verify the permissions are correct. Make sure the role/service account has the necessary permissions to start and stop the resources. You can check the permissions in the cloud provider's console.
- Check the resource in the cloud provider's console to see if the resource is in a state that might prevent it from being started or stopped. Databases or other cloud resources may end up in a state that does not allow them to be started or stopped (e.g., a database is under maintenance, there is no recent snapshot, etc.).
- If all of the above are accounted for, please reach out to support@vegacloud.io for further assistance.

